Showing posts with label Handout. Show all posts

Sunday, August 18, 2013

SLC TEMPLE HANDOUT/CRAFT IDEA


**UPDATE **: Please click here for the: Temple Template

I am super excited about this!  I saw this idea on Pinterest, but it had no instructions or any detail.  I just gave a Come Follow Me lesson on "Why is Temple Marriage Important?"  I gave this as my handout, but this would be cute for girls camp too.  I purchased two, 2 1/2" x 8ft* board from Home Depot for $2.12 each.  And some sparkly tuelle from Hobby Lobby for $2, so the whole project cost me $7 and it made 13 temples!  For the middle part of the temple I used bead board.  I had some left overs from a different project.  So if you don't have bead board, then that is where it will get spendy.

In order to create this, you need a band saw.  The right tools are EVERYTHING!  I cranked everything out in about 2 hours!  Then, I just glued the pieces together with wood glue, and painted it. Voila!  It was SUPER easy, just takes time and skill.  If you are interested in the template, send me a coment and I will upload them.  The project is about 5"w x 7"h. 

*After doing this, I may have upgraded to a 6"x 8' piece of wood, that way, I could have made the back two steeples in one piece instead of two, then I could have glued the middle bead board piece on top. 
Posted by Picasa

Girls Camp: Pillow Treat

I bought the tissues at the Dollar Store.  They came in a 8 pack for $1. 
For girls camp every year we do a pillow treat each night for the girls.  I came up with this idea last year and it went over so well, that we decided it will be something we will continue to do every year.  We make sure that this is given to them the night before testimony meeting so that they come prepared.  Usually, our tent leaders will incorporate our treat into a nightime devotional. 

If you'd like the print out, click on the link below:
TESTIMONY TISSUES
Posted by Picasa

Come Follow Me: July-What Does It Mean to Take the Name of Jesus Christ Upon Me


This was my handouts for the girls.  I think it would ha ve been great to get the actual name tags from the store, but I didn't have the chance to get there.  So, I found the image on line and added to it.  If you're interested in a FIB template you can download one HERE.
Posted by Picasa

Monday, March 18, 2013

Come Follow Me (March Lesson) Handout: What is the Resurrection?


I read President Monson's talk, He is Risen that the lesson guide suggested.  I LOVED his story about Jason that he relates at the end of his talk.  I decided to play off of the word "NEVER" that Jason so boldly professed in his hospital bed.  I thought it was very powerful.  I wrote this little saying to go with Jason's words and to sum up my lesson on the resurrection   I also showed the Bible video: For God So Loved the World (John 3:16), during my lesson.  It turned out really wonderful! I am so grateful for the atonement and resurrection of Jesus Christ! What a wonderful blessing promised to each of us!  

I used chocolate gold coins, and butterscotch discs to represent "riches".  I then wrapped them in tulle, added a ribbon and stapled it to the quote.
Posted by PicasaClick here to print out the quote: NEVER LOSE FAITH IN JESUS CHRIST


Sunday, February 17, 2013

Come Follow Me (February Lesson): Why Do My Choices Matter?

I had this photo printed at Costco, and on the back I put President Monson's 3 R's of Choice.

I went with an Alice and Wonderland Theme.  I was reading through Pres. Monson's talk titled the 3 R's of Choice and he referenced the movie Alice and Wonderland when she meets the Cheshire cat on the pathway and asks which way to go.  I found the clip on you tube (only 3 min long), downloaded it and showed it to the class.  After we watched the clip, I asked them if they ever felt like Alice did, not knowing which direction to take.  I then made this relation and put it on the board:
Alice=You
Cheshire Cat=Influences
Path=Consequences
Conscience/Moral Compass= Our Values

I have a print out of these at the end of this post.  It was nice to put them on the board as a Visual Reminder to the girls.  After we had talked about all of this, I then made a quiz for the girls to fill out. I wanted to teach them that when we understand our values, we can understand what choices to make.  We actually went through the quiz together. I stopped on every question, added my thoughts and asked for experiences and feedback.  It turned out incredibly wonderful! I also used some of the talk by President Monson, when appropriate.  As a hand out, I bought some Little Debbie cakes and wrote on them with Frosting: "Eat Me", just to go with the Alice and Wonderland theme.


I wrapped them in cellophane and added this vintage Alice tag.


If you want any of the printables, you can find them listed below:
Alice and Wonderland Visual Aid for board
Who am I Values Quiz
 3 R's of Choice for back of picture
Vintage Alice Tag
Alice and Wonderland Video from You Tube-
(to dowload the video, click on the url address and type in the word "kiss" in front of the "you" in youtube.  It takes you to another site that will let you download it. Click "run" and select the quality. So simple and it works!!!)

Alice and Cheshire Cat Picture with Quote- You should be able to right click and save to your computer.
And if you have any questions, please feel free to leave a comment!  My lesson was so successful and I presented it in memorable way using characters that were familiar to them. 
Posted by Picasa

Monday, March 19, 2012

Lesson #9: Honoring Parents


Sometimes SIMPLE IS BEST!!!!  I love making handouts and doing fun things for the girls, but it can also be a lot of work.  This time I found some cute notecards on clearance at target and I found this idea on Sugardoodle.  I gave the girls each a "thank you" card with this saying on it by Pres. Monson.  I told them to go home and write a note to their parents and tell them how much they love them.  It was perfect, and to top it all off, I had a plate of brownies to share too!  If you'd like the printable of the saying to paper clip with the card, you can print it out here.
Posted by Picasa

Saturday, February 25, 2012

Lesson #7: Homemaking


I am SUPER excited for this lesson!  I purchased a set of 4 wooden spoons from walmart for $.88.  In our yw closet, we had a metal stamping set we had used for another activity.  The wood on these spoons were so soft just a few hits with the hammer left a really great indent.  So, I stamped on my saying and then to make the words stand out, I  just traced over the letters with marker.
After that was done, I tied the spoons with ribbon and attached this recipe card with it. I am so happy with the way the recipe card turned out. I couldn't be more pleased!
  

* NOTE: I made a mistake! I first did the red (Not washable) marker and it LOOKS really cute, but when it gets wet the marker bleeds. So I went over it with a black fine point sharpie, which will not bleed. So please don't make my same mistake, just use a permanent marker if you do this and not the colored marker. If you don't have the stamping set, I bet just writing it with permanent marker would also work.


Click Here to use the free printable for the recipe card front
To give credit, to where credit is due, I found the template for thre recipe cards here.


Posted by PicasaClick Here to open the quote for the back of the recipe card.

Lesson 5: Finding Joy in our Divine Potential


For this lesson, the manual says to invite a guest speaker so that is exactly what I did.  Afterwards, I spoke to the girls for a few minutes.  This handout turned out PERFECTLY!  It tied in with the lesson so well.  The saying on the side of the shoe says, "LOVE THE SHOES YOU"RE IN!"  I wanted to get the message across that we are daughters of our Heavenly Father.  WE shouldn't try to be anyone else, but we should learn to love ourselves.  I filled the inside of the paper shoes with heart candies and embellished the shoes.  The girls literally wend gaga over these!  I had a few mom's stop me in the halls and comment on them as well. 

Posted by Picasa I found the template for these shoes here.
 *note, these are so cute, but quite time consuming.  I found a few easier patterns, but they aren't as detailed. 

Click here to print out the saying, "Love the Shoes You're In!"

Friday, January 20, 2012

Value Color " Cheat Sheet"


I can never remember which color is which!  So I made the little go to "cheat sheet" to help me!  I just printed it off (carstock is best) and put in on the clear outside pocket of my young women binder.  As you can see by the tear in the corner, I have already referred to this quite a bit!  Just a helpful little tool if you want to use one!  Click here to download this document.
Posted by Picasa

"Stick with Personal Progress"- sticky notes


I am so excited about this idea!  We made these to give to the girls at our Young Women's in Excellence program.  I was inspired by another leader who told me as she was working on her personal progress goals, she would put sticky notes on her mirror to help her remember which goal she was working on.  I thought it would be perfect to customize some sticky notes for our young women to do the same.  I found a website, VISTA PRINT, that will customize them for you.  If you "google" vista print, you can find an offer for 50% off sticky notes.  This was kind of more on the expensive end, but totally worth it, and it turned out to be less than $1 per girl.  I went through the personal progress book and found that there is a little over 16 goals that require "two weeks or more".  These are what the girls would use the sticky notes for.


For example, If they were working on being more christlike for two weeks, they would write which value experience that would be, then in the goal section write: "be more christlike", and what the date will be in two weeks when this will be completed. I just uploaded the photo of the temple I found on
Sugardoodle here, then used Vista Print's editing program to make a custom sticky note. Each pad comes with 50 sheets, and I needed 16 sheets per girl, so I was able to get 3 sets out of each pad. That may help you when deciding how many you need. The more quanitity you buy, the bigger discount you get. Once seperated, I just cut a plain white piece of paper the same size as the sticky note and put it on the back so that it looked like a full pad of sticky notes. 


I attached this saying to the back of the sticky note, thne tied it with tuelle to embellish it.  If you'd like the quote click Here.


Posted by Picasa

Friday, January 13, 2012

Lesson 2: Jesus Christ, the Savior

I am so happy with the way these turned out. Lesson 2 in YW manual 1 is on Jesus Christ, our Savior. I got this idea from  SugarDoodle and totally made it my own. I wasn't going to do a big handout this week since I have to speak in sacrament AND teach a lesson, but when I read that this could go with Faith #5 out of personal progress, I couldn't resist. Faith #5 talks about the Savior and asks the girls to journal it. So this is their personal journal about the Savior.


 I also used some pass along cards of Jesus and glued them inside these journals. I found the journals at Michaels for only$0.30! I was SO EXCITED!  They had a picture of a apple pie on the front of them, but I just bought a piece of scrapbook paper and put over the top of the picture, then did each of the girl's initals on my computer. I also found 3D butterfly stickers to embellish them. I just had the ribbon downstairs in my endless supply! So, this was a SUPER CHEAP handout. I am pretty excited to give them this.  This idea would be great for a personal progress activity too, if you didn't want to use it with your lesson. I have a copy the scripture list I used and the template for the initals, if you want them just comment and I can upload the link. 

-Here's the Link to print out the scripture list
-Here's the Link to make your own Monogram Letters
 (Just note that the letters are editable, which means my font will be different than yours.  If you like the font I used, you will have to download it here.  It is called "Little Lord Fontelroy").  

Sunday, January 1, 2012

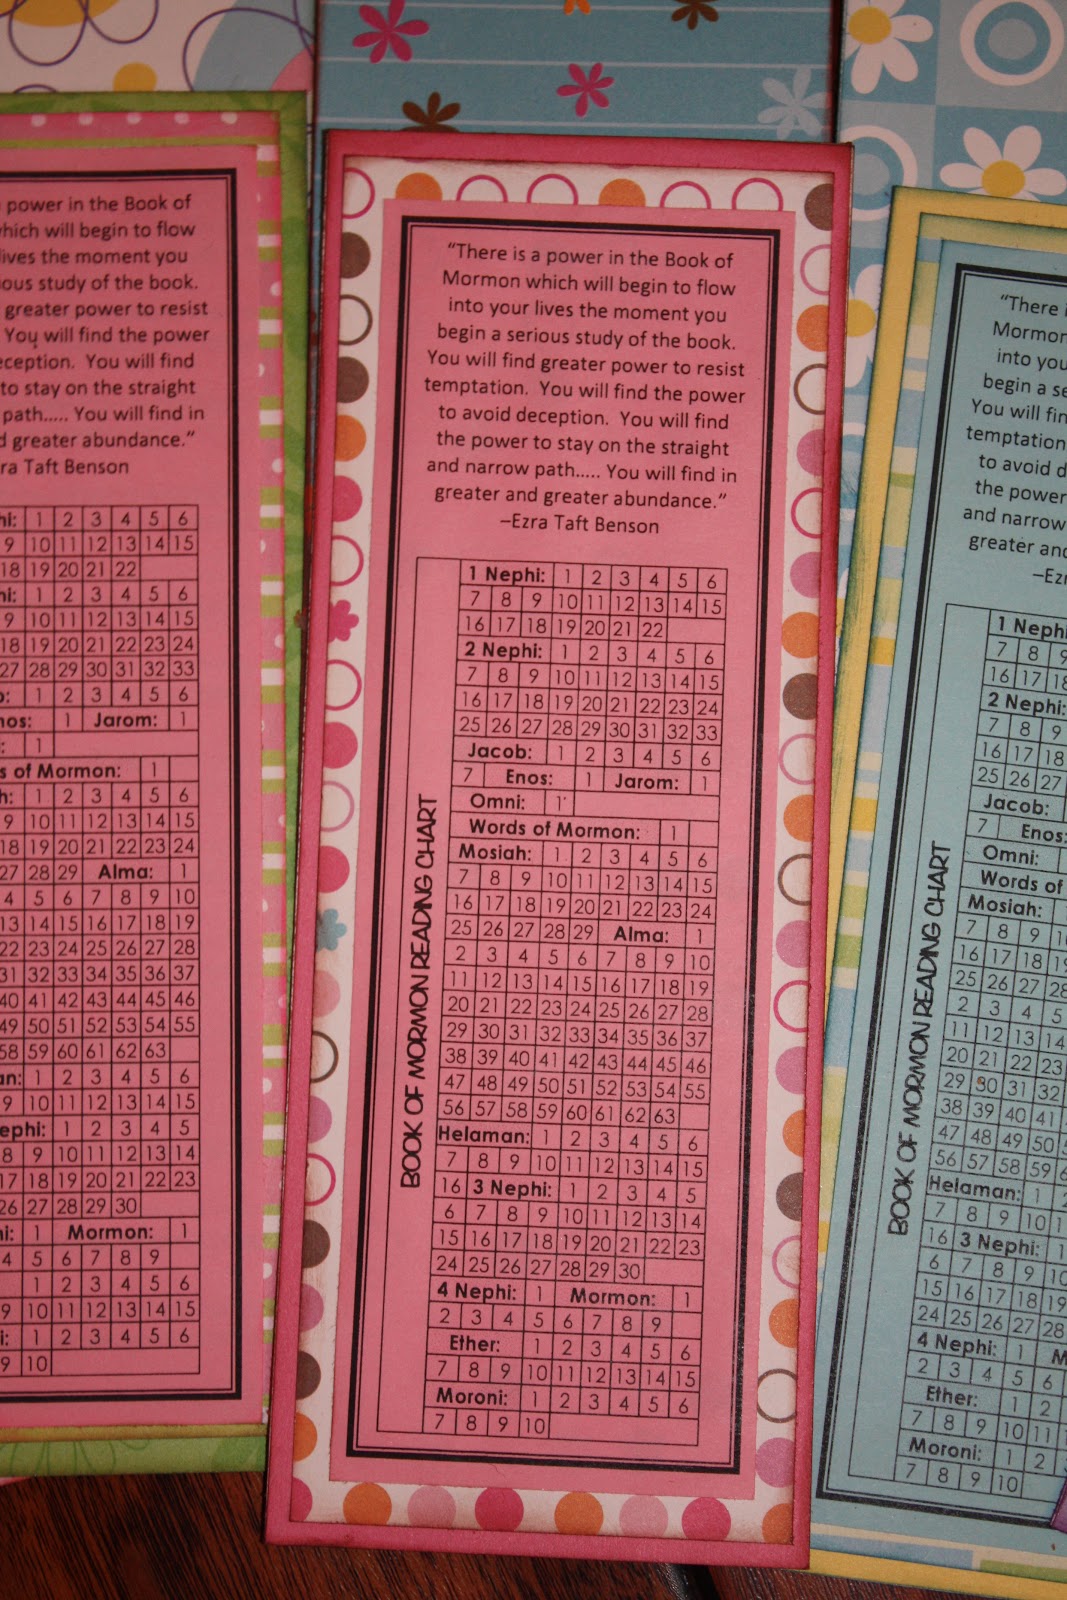
Book Of Mormom Reading Chart


For 2012, we have decided to make reading charts for the young women to follow.  We made these bookmarks really cute!  We will be laminating them and found that the girls could use a permanent marker over the laminating to mark off what they have read.  We are so excited to give them the challenge to read this year.  It also will coincide with their virtue requirement of reading the Book of Mormon.  I took these pictures before I laminated them, so after that is complete, I will punch a hole in the top of these and then put 3/8" ribbon through them.  So cute!  I have to give credit for the chart, we found them somewhere on line, and I just can't find the reference, but I was able to recreate it in a printable document. 

If you want a copy of the chart, please check here: Book of Mormon Reading Chart

Lesson 1: Daughter of God


For my handout for the girls, I made these cute mirrors for their lockers. I just purchased 3" mirrors from the craft store and cut out a frame for each mirror, glued it on (I found E6000 work the best), added a magnet to the back and then embellished! My girls LOVED these! I have a pazzle, which is like a cricut machine to cut out the frame. I created the design on my computer, printed them out with the words, "I am a Daughter of God" and then ran it through my pazzle machine.

To go along with the mirror, I found a talk by Elaine S. Dalton and I used her quote,

"Young women of The Church of Jesus Christ of Latter-day Saints, remember who you are! You are elect. You are daughters of God. You cannot be a generation of young women who are content to fit in. You must have the courage to stand out, to “arise and shine forth, that thy light may be a standard for the nations.” The world would have you believe that you are not significant—that you are out of fashion and out of touch. The world calls to you with unrelenting, noisy voices to “live it up,” “try everything,” “experiment and be happy.” Conversely, the Holy Ghost whispers and the Lord invites you to “walk in the paths of virtue,” “lay aside the things of this world,” “and cleave unto [your] covenants.”

I concluded with this quote and then told them to look in the mirror and remember who they are.  They are beautiful and their light shines for all to see.  It was a great way to end the lesson.  I also, used the recommended quotes from the lesson as a handout with the mirror.  Click here to find it.


IF you need to template for the mirror frames, I have an image of them, or a pdf version.  Use whichever works best for you. 

PDF version: mirror Template
JPEG image: mirror template.

This is for Young Women Manual 1.